Creating WinRE Bootable Media
Knowledge Base
Creating WinRE Bootable Media
A boot disk (sometimes called a startup disk) is a media file that contains startup files that your computer can use to boot up, in case the operating system of your computer becomes corrupt or unusable.
Recovery media (WinRE) can be used to restore a Windows device to a working state, even if the user needs to replace the hard drive or completely wipe the drive clean.
You would need to create the Windows RE bootable media in X64 or X86 environment depending on the OS architecture you are restoring.
For creating a Windows image, follow the steps below or learn more here.
- Download and install the latest Windows assessment and deployment kit (ADK)
- A Windows OS image (Install.wim). You can either use the base Windows image or a customized recovery image.
- A Windows RE tool image from extracted Windows image
- USB flash drive (8GB and above) for creating Windows recovery environment
Note: Windows image can be downloaded from the Microsoft website: (Sample link):
Step 1: Install and open the deployment and imaging tools environment
- Sign in to any computer (for creating the USB WinRE boot disk), with Administrator privilege.
- Download and install the latest Windows ADK and install it by following the wizard, until you reach the 'Select the features you want to install' screen of the Wizard.
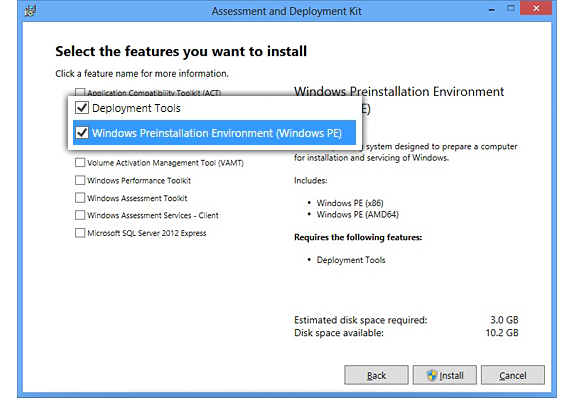
- Select the options for 'Deployment Tools' and 'Windows Preinstallation Environment' (Windows PE), and clear the other selected options, if any.
- Click 'Install', and wait for the installation of the assessment and deployment kit to complete.
- Click 'Start', and enter deployment. Right-click 'Deployment and Imaging Tools Environment' and select 'Run as administrator'.
Step 2: Extract the Windows RE image from the Windows image
- Mount the Windows image.
- Right-click the Windows image (.iso) and mount to view contents inside the iso file.
Once image is mounted, copy 'install.wim' from 'G:\sources\' to 'D:\ sources' , where G is the ISO mounted drive:
md c:\mount\Windows
Dism /Mount-Image /ImageFile:D:\sources\install.wim /Index:1 /MountDir:C:\mount\Windows\
where D is the location where install.wim is present.
Copy the Windows RE image:
md C:\Images
xcopy C:\mount\Windows\Windows\System32\Recovery\winre.wim C:\Images\winre.wim /h
Unmount the Windows image:
Dism /Unmount-Image /MountDir:C:\mount\Windows\ /Discard
Step 3: Create a working folder for Windows RE files
- Create a folder structure for Windows RE, which is based on Windows PE:
- For X64 Architecture: copype amd64 C:\resetmedia_amd64
- For X86 Architecture: copype x86 C:\resetmedia_x86
where amd64 or x86 is the architecture of the system you are creating the media for. - Replace the default Windows PE boot image (Boot.wim) with a Windows RE tools image:
- For X64 Architecture: xcopy C:\Images\winre.wim C:\resetmedia_amd64\media\sources\boot.wim /h
- For X86 Architecture: xcopy C:\Images\winre.wim C:\resetmedia_x86\media\sources\boot.wim /h
Step 4: Add the Windows image
- For X64 Architecture: copy D:\sources\install.wim C:\resetmedia_amd64\media\sources\install.wim
- For X86 Architecture: copy D:\sources\install.wim
C:\resetmedia_x86\media\sources\install.wim
Step 5: Create bootable USB flash drive
- Install Windows RE on a USB flash drive:
- For X64 Architecture: Makewinpemedia /ufd C:\resetmedia_amd64 F:
- For X86 Architecture: Makewinpemedia /ufd C:\resetmedia_x86 F:
- Label the USB flash drive with a descriptive name.
- In 'File Explorer', right-click the drive, select 'Rename', and enter 'Full-PC Recovery'.
- Use this bootable USB device to start your PC in the WinRE environment.